This Review for Cetus was written by Zepeng Zhou, a graduate student at Washington University in St. Louis. Mr. Zhou is a student in the Department of Architecture and was in the need of a 3D printer to help him complete his graduation project. During the time, he happened to encounter some problems and contacted Tiertime. We were very happy to help him solve the problem, and in the end congratulated on his successful graduation design. This article was about the experiences of Mr. Zhou using Tiertime’s Cetus printers. We would like to share it with everyone and hope that it would be useful for all of us.
First of all, I was very honored to write the Cetus 3D Printer Review.
I am a graduate student of Architecture Department of Washington University in St. Louis, and 3D printers were no strangers to me. My first contact with 3D printing was the second year of my study, in which time a project was needed to create a curved arch, and the two-dimensional material such as cardboard could not meet the requirements in 3D modeling.
I have been using 3D printers for a year and a half since. A 3D printer can help meet almost all the requirements in 3D modeling. My design was no longer restricted by constraints due to shapes or materials, and made great progress.
Also, a 3D printer greatly improved the efficiency of my work. I could split myself to designing and physical modeling at the same time, and more importantly squeeze a little more time for me to sleep in the challenging architectural design academic study.
In general, the benefits of 3D printers are mainly the following:
1. Save time and free up time to design.
2. Design in 3D in the phase of drawing, in stead of using 2D modeling which has very limited scope, and free yourself in the design with no limitation.
3. In the extremely small and complex design, you can take advantage of the accurate printing of 3D printers.
Today, I would like to use my graduation design project to share my experience of using Cetus.
First, here is my work – the design of St. Louis Grand Mosque and Bath:
In fact, the most important part of the design was the dome.
The 3D printed model
The Rendered Images
The dome was connected and fused with layers of ring beams. The final force will be transferred from the small circle beams at the top to the large circle beams below, and passed the weight to the earth by the surrounding load-bearing walls of the mosque chapel. Structurally speaking, the structure was very sound.
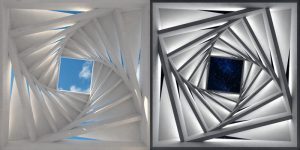
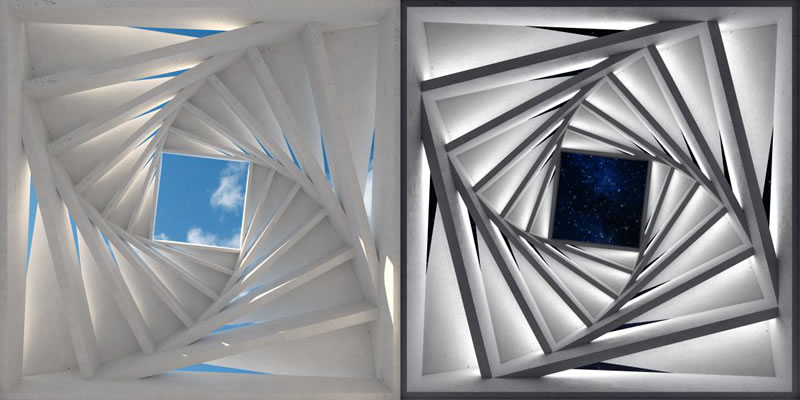
In order to print the structure, I tried the “supported” and “unsupported” print modes in the UP Studio Software.
The following images reflected the results that I got.
The one on the left was with the option with support structure, and the one on the right was the one with no support option. From the printed model on the left you can see that it was very dense and not easy to remove the support structures, so I gave it up. The one with no support on the right was a very clean print. It just printed whatever was designed, very convenient.
However, it was worth noting that only a structurally sound model can safely perform the “unsupported” option. Since each beam in this model was tied up together, it was stable and could be printed with “unsupported” option. If the printed object had a overhang structure, it would be necessary to add a support structure, otherwise the object would be severely deformed or collapse.
The summary of the using the option “with or without support”:
1. It is best to print the support structure for general objects.
2. For a well-structured model with no overhang structures, try the “unsupported” print mode.
3. For models with complex shapes that are difficult to separate the support structure, try using a finer nozzle (0.2mm) for an “unsupported” print.
It is also worth noting that the nozzles need to be changed to a finer one when printing some small and detailed structures. Generally speaking, the 0.4mm nozzle can meet the accuracy of the general model. However, when printing some small and detailed structures, you need to use the 0.2mm nozzle.
The finer nozzles can make more detailed structures, and at the same time, it will have a bigger number of layers to print, and it will be more stable which is more suitable to “unsupported” printing.
The print on the left side was the 0.2mm print with “no support” option, and the one on the right was printed with 0.4 nozzle with “no support” option, and the result was not good. The structure collapsed. So the choice of whether or not to have support is mainly to look at the original structure of the model. If the model is well-structured, you can use the “no support” option. However, if the model itself is complicated and difficult to clean up, it is recommended not to use the support option, but use the higher accuracy options to increase the “no support” printing.
Experience for printing small objects:
1. Small objects should be printed in “no support” mode.
2. Try to use the most detailed print mode of the current nozzle, that is, use the lowest layer thickness.
3.If the current nozzle does not meet the printing requirements, replace the nozzle with a finer nozzle (0.2mm).
The “Type” for Material has two options, ABS and PLA. The print surface will be heated when using ABS to print. The generic Cetus 3D printer does not come with the heating feature with the normal setup. Generally the nozzle temperature of Cetus can reach 260 degrees Celsius. However, Cetus is designed for PLA, which requires the nozzle temperature to be 210 degrees Celsius. The same model using ABS may be more accurate, but it is a bit difficult to remove the raft. So it is recommended to print with PLA.
The top one in the picture is a PLA print printed up-side-down. Due to the small structure, if the printing was not reversed, the support structure would be badly formed, which is like the fourth model, some parts got knocked out due to the interference with the printer’s nozzle. The second model was the effect of printing PLA materials in ABS mode. Due to the high temperature of the nozzle, the model has the drooling effect. Although the mold looked very good, it was particularly troublesome when later removing the support structure.
PLA is the default material for printing in Cetus, and the corresponding material needs to be selected in the Material Type column. Another thing is that it is possible to rotate the model to control the orientation of the model to the print surface to minimize the support structure.
The print surface can be coated with a layer of painters tape to make the model stick better to the print surface. The contact area of the model and the print surface should be minimized. Because if the contact area is too large, the contact area will shrink toward the center as the number of printed layers increases and the underlying material cools. If the material do not have a strong grip on the print surface, the entire contact area could warp. So smaller the contact area, the better.
To summarize, The product quality of Cetus is good with responsive after-sales service. The Cetus printer is also very popular in our Stduio. Compared to other equivalent products, Cetus works very reliably and quietly.
Thanks to Tiertime for help me make progress with my academic works. A fire burned down all the laser cutting machines in my school, which made all 3D printers particularly important. The responsiveness of the after sale service was also very impressive, which made me finish my project in time.
Thanks again to Tiertime’s Cetus 3D printer.
Zepeng Zhou
Washington University in St Louis
March Grad 2018
American Council on Exercise
Certified Professionals
Cetus 3D Printer Helps Architecture Student Complete Graduation Design
https://www.facebook.com/tiertime