——————————— Dr. AJ Laarman, West Michigan Aviation Academy
Creating a 3D printer “farm” does not have to be costly. Here is a plan created by students and faculty at the West Michigan Aviation Academy in Grand Rapids, Michigan with a tight budget, great hopes, and high ambitions. The purpose of this project was to significantly increase the hands-on exposure to 3D printing for all students and in all departments.
It began with applying for and securing a Community Fund grant from our local Bosch, USA company. The grant would allow us to purchase a large number of low-cost 3D printers that were easy to program and operate. User training time needed to be kept to a minimum to provide a functionality-friendly environment and immediate student success. Inexpensive printer material cost was also a priority because of the anticipated volume of use.
After receiving the grant and researching several 3-D printer models and companies, we decided to purchase Cetus 3D printers directly from Tiertime. We felt this printer would meet our needs and was inexpensive enough to simply swap-out a printer that might need adjustments or was experiencing technical issues.
The second challenge was to create some type of mobile cart to house the printers with the additional goal of not having to remove them from the cart during printing operation. Meeting this second objective created three new challenges: 1. Design a spool mechanism to feed each printer; 2. Make sure a standard 120 volt AC, 20 amp electrical distribution system could handle the number of printers; and 3. Allow for a single-screen monitor and laptop computer to easily access each printer for uploading programs and monitor printing progress.
Below is a material list and to the right is simple diagram of how a printer farm could be constructed using materials purchased at a local box store or lumber yard.
Quantity Description Use
3 ¾” x 4’ x 8’ plywood Sides, bottom and shelving
2 4’ x 8’ Masonite , Back panel of unit
3 ½” x 2” edging , Trim and support for front of shelves
4 Heavy duty casters , Unit mobility
1 Laptop computer , Uploading programs to printers
1 Flat screen monitor ,Monitoring program & printer status
4 120 volt AC power strips , Power distribution
3 7 port generic usb hub ,Printer communication
1 Windows PC (w/ touchscreen), Printer control
1 LED Light strip , Lighting
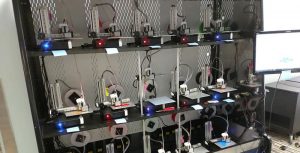
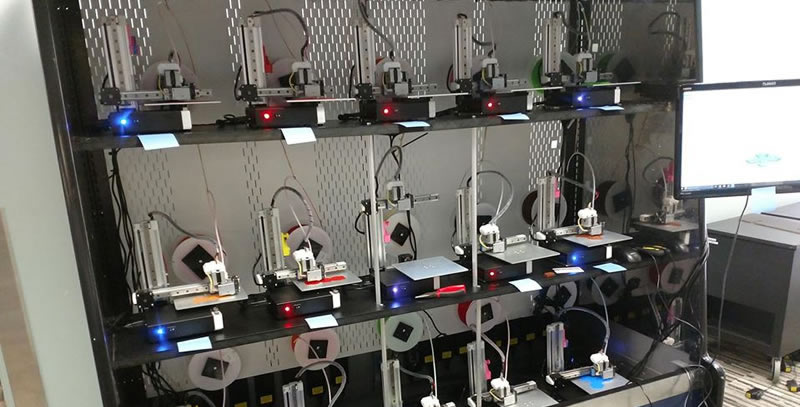
We were fortunate to discover a food display case that was no longer being utilized by our food service department. After many collaborative design discussions, students removed all the refrigeration equipment and existing shelving. The next challenge was to determine the number of printers that could realistically function within the existing structure while keeping electrical amperage needs below 20 amps. A material spool-feed system was also designed which allowed for ease of material flow to each printer and simple spool changes. In the end, our farm could accommodate fifteen (15) printers on three different shelves. Cart mobility was important to us in order to move the farm to different departments within the school who wanted to use it for several days at time.
After demolition and removal of all non-structural items (including entire cooling system), we test fit all of the Cetus printers (picture to the right) to get proper spacing and shelving height. After the test fit, the aluminum base of each printer as well as the shelf was drilled and bolted together, securing the printers for mobile transport. With the printers removed, power supplies and cable routing were installed out of sight and below the lowest shelf.
Notice the initial bowing in the shelves in the picture, we decided to add a rigid supporting structure for the printer shelves. After all the cables were installed, we installed a Windows PC in the bottom of the unit for the controlling of the printers. For the connection of the printers, we installed one USB hub at the beginning of each shelf for all of the printers to plug into. Then, we ran 3 USB hubs (with extensions) to the computer for connection of the printers.
Once the computer was up and running and the Cetus software was installed, it was just a matter of installing and naming one printer at a time. For this step, I would recommend putting a labeled piece of tape on each printer before hand to help you better organize your naming convention.
During this process, we also found it was important to only
have one printer turned on and connected at a time. Once all printers
were named properly, we turned them all on and were pleasantly
surprised to see them all showing up nice and neat in the included
software from Cetus3D.
The software made the connection to each printer seamless and simple
as you could start a print on one machine and then just to select a new
printer and start another print on a different machine.
After running these machines pretty hard for almost a full year with the majority of the material being PLA,
we are super impressed with them and in fact are making plans to
purchase even more printers to create a whole room full of them in
addition to the cart. Our goal is to have enough printers where we
never have a bottleneck for our classes. We have well over 150
engineering students at any given time working on projects that
eventually need to be printed out, so we’re in the throes of designing
additional space for more printers. Several of our printers have chewed
through nearly 5 kg of material already with very minor issues and
very few breakdowns.